How to Check OTF Knives for Finish Defects Before Accepting a Batch

Short answer
Learn how to inspect OTF knives for finish defects with clear pass, monitor, and reject criteria. Practical QC guidance for wholesale buyers, distributors, and
Key Takeaways
- Knife rules can vary by state, city, blade style, opening mechanism, carry method, and intended use.
- Do not treat a product nickname as a legal category; check the actual features and local rule.
- Retailers should keep legal or safety language factual and avoid promising that one item is allowed everywhere.
Terms Used Here
- OTF
- Out-the-front; a knife design where the blade moves forward from the front of the handle.
In this article
- 01 Set the inspection conditions before you judge the knife
- 02 Inspect the knife in the order defects usually show up
- 03 1. Handle scales and frame surfaces
- 04 2. Blade flats, coating, and grind appearance
- 05 3. Screws, clip, glass breaker, and small hardware
- 06 4. Logos, laser marks, and private-label graphics
- 07 Use a simple pass, monitor, reject verdict for batch decisions
- 08 Common mistakes that lead to wrong finish calls
- 09 What to record so repeat orders stay consistent
- 10 FAQ
- 11 How many finish defects are acceptable in an OTF knife batch?
- 12 Is slight color difference between OTF handle halves always a defect?
- 13 Should I reject a knife for one tiny mark under the pocket clip?
- 14 What finish issue on OTF knives is most often missed?
Check OTF knives for finish defects by inspecting the handle, hardware, blade coating, grind lines, and logo application under consistent light, then sorting each issue into pass, monitor, or reject. For OTF models, a true defect is not just a cosmetic mark; it is a visible finish problem that exceeds normal production tolerance, repeats across the batch, or suggests weak process control that will hurt resale, private-label presentation, or repeat order consistency.
Before calling something defective, define what is normal on an OTF knife. Minor variation in anodizing shade between separate production lots can be normal. Very light witness marks hidden under the pocket clip or inside the firing track opening can also be normal. What is not normal is obvious coating loss on exposed surfaces, mismatched handle halves, recurring scratches on the presentation side, crooked laser marks, or finish flaws that appear on enough units to indicate a line problem rather than random handling.
Set the inspection conditions before you judge the knife
Finish inspection becomes unreliable if the viewing conditions are inconsistent. Use the same setup for every sample and every repeat order.
- Light: Use bright neutral white light. A desk lamp plus natural daylight is better than warm warehouse lighting.
- Background: Inspect over a plain gray or white surface so dust and color shift are easier to see.
- Handling: Wear nitrile or cotton gloves if the handle is dark, stonewashed, or polished. Finger oils can hide or create apparent marks.
- Sample size: For a small wholesale lot, inspect all units if possible. For larger batches, pull a spread from different cartons, not just the top layer.
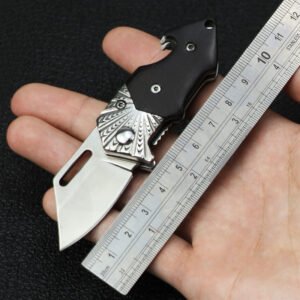
- Viewing angles: Rotate the knife slowly at 45 degrees under light. Many OTF finish defects only appear at an angle, especially on anodized aluminum and coated blades.
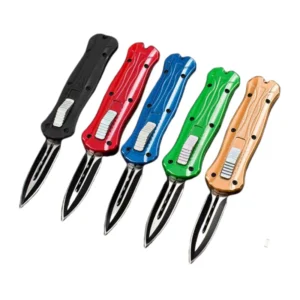
If you are sourcing across multiple styles in the OTF product range, inspect each finish type by its own standard. A black coated blade, a satin blade, and a stonewashed blade will reveal defects differently. The mistake is using one visual standard for all three.
Inspect the knife in the order defects usually show up
A consistent sequence helps you separate random handling marks from repeatable factory issues. On OTF knives, start with the handle body because it has the largest visible area and usually carries the most customer-facing finish risk.
1. Handle scales and frame surfaces
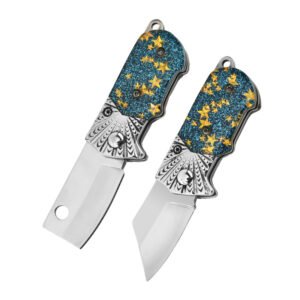
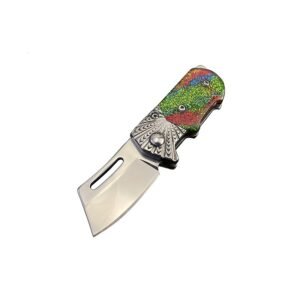
Look for scratches, dents, uneven blasting, cloudy anodizing, color mismatch between the two handle halves, and sharp transitions near chamfers. On private-label OTF knives, the presentation side should be the strictest inspection point because that is what the end buyer notices first.
- Normal: Slight tone variation at internal edges, very small hidden marks under the clip, or tiny finish interruption at screw holes.
- Borderline: One faint hairline mark visible only at one angle on the non-presentation side.
- Reject-worthy: Deep scratch felt by a fingernail, obvious color mismatch between left and right scale, dented corner, or repeated cloudy patches on multiple units.
2. Blade flats, coating, and grind appearance
Deploy the blade and inspect both sides from tang to tip. OTF blades often show finish problems near the opening where the blade exits the handle, so check that area carefully.
- Normal: Fine stonewash variation, minor satin line inconsistency that does not break the overall appearance, or a tiny contact witness mark near the tang hidden when closed.
- Borderline: Small rub mark near the blade exit on one sample if it does not expose raw metal and does not repeat across the batch.
- Reject-worthy: Coating chips on the blade flat, exposed substrate on the presentation side, blotchy PVD or paint-like coating, uneven grind line that looks visibly crooked, or recurring drag marks caused by internal contact.
A useful rule: if the mark is visible from arm’s length on an open blade, treat it more seriously than a mark that requires tilting under direct light.
3. Screws, clip, glass breaker, and small hardware
OTF knives often fail cosmetically at the hardware level even when the handle looks good. Check screw heads for tool slip, coating mismatch, and burrs. Look at the pocket clip for edge wear, weak plating, or poor contact points where it meets the scale.
- Normal: Tiny finish variation inside drive recesses or slight clip spring polish where metal touches metal.
- Borderline: One screw with a slightly lighter coating shade if the rest of the unit is clean.
- Reject-worthy: Stripped screw head, clip coating flaking before use, mismatched hardware color, or repeated tool marks across the lot.
4. Logos, laser marks, and private-label graphics
If the knife carries a house brand or OEM marking, inspect alignment and edge sharpness. Laser marks should be centered, level, and consistent in depth and color.
- Normal: Very slight tone difference in laser darkness between separate lots.
- Borderline: Small placement drift that is only noticeable when compared side by side.
- Reject-worthy: Crooked logo, double-marked text, fuzzy edges, or branding placed so close to a bevel or screw that it looks accidental.
Use a simple pass, monitor, reject verdict for batch decisions
Wholesale QC works best when every inspector uses the same language. A three-part verdict keeps the decision practical.
- Pass: Finish matches the approved sample. Only normal tolerance is present. Defects are not visible in normal retail viewing and do not repeat as a pattern.
- Monitor: Minor cosmetic issues exist but are limited, isolated, and unlikely to trigger returns if accurately graded. Keep photos, note carton numbers, and compare against the next shipment.
- Reject: Visible finish defects affect presentation, branding, or perceived value; repeat across units; or suggest unstable process control that makes repeat orders risky.
Here is one compact scenario. You inspect 60 OTF knives from a 300-piece lot. Four units show faint non-presentation-side hairlines visible only under angled light. Two units have obvious blade coating chips near the tip visible at arm’s length. One unit has a crooked laser logo. Verdict: the hairlines are monitor; the chipped blades and crooked logo are reject. If the same blade chip appears on more samples from other cartons, treat it as a batch-level reject, not isolated damage.
This is where landed-cost logic matters. A low unit price does not help if 3% to 5% of a batch must be culled, repacked, or discounted. Cosmetic rejects consume labor, replacement freight, and retailer goodwill. For importers working on tight MOQ and lead time windows, a stable finish is often more valuable than saving a small amount per unit.
Common mistakes that lead to wrong finish calls
Most finish disputes are caused by inconsistent standards, not just bad knives. Avoid these common errors.
- Confusing finish style with finish defect. Stonewash is supposed to look varied. Satin is supposed to show directional lines. Judge each finish by the approved sample, not by a different finish type.
- Ignoring normal OTF contact points. A tiny hidden witness mark near the blade path may be normal. Repeated exterior drag marks at the blade exit are not.
- Inspecting only the top carton layer. Mixed cartons can hide lot variation in anodizing shade or hardware color.
- Overreacting to isolated micro-marks. One small hidden blemish on one unit is not the same as process instability across the batch.
- Underreacting to repeat patterns. Three or four units with the same scratch location usually means fixture, tray, or assembly contact damage.
- Skipping approved-sample comparison. Without a retained sample, teams drift into opinion-based QC.
For wholesale programs, write the finish standard into your sample policy before production starts. Define acceptable cosmetic tolerance, note any protected surfaces such as the presentation side or branded face, and confirm how replacements are handled if defects exceed the agreed threshold. If you need that discussion documented before packing, use the QC and packaging inquiry form to align on inspection points, packaging method, and carton-level checks.
What to record so repeat orders stay consistent
The best finish inspection is not just a one-time gate; it becomes the baseline for the next order. Record what you see in a way that another buyer or warehouse manager can repeat.
- Take photos in the same lighting of any defect class you call monitor or reject.
- Count by defect type, not just total rejects. Scratches, coating chips, logo misalignment, and color mismatch should be tracked separately.
- Note carton numbers or production codes so the supplier can isolate the source.
- Compare against the sealed sample or approved prototype rather than memory.
- Review repeat-order stability by checking whether the same finish issue appears across multiple lead times.
For B2B buyers, this matters more than a single attractive sample. A factory that can hold cosmetic consistency across MOQ-level production and repeat purchase cycles is usually safer than one that produces one perfect pre-shipment sample but drifts during full assembly and packing.
FAQ
How many finish defects are acceptable in an OTF knife batch?
There is no universal number. A practical standard is this: isolated hidden micro-marks may pass, visible recurring marks should be monitored, and any repeated presentation-side defect or exposed blade coating loss should be rejected.
Is slight color difference between OTF handle halves always a defect?
No. Slight variation can be normal, especially across different lots or some anodized finishes. It becomes reject-worthy when the mismatch is obvious in normal viewing or repeats across several units in the same batch.
Should I reject a knife for one tiny mark under the pocket clip?
Usually no. A hidden mark under the clip is often normal if it does not spread beyond the covered area and does not indicate rough assembly. Reject it only if the mark is severe, repeated, or paired with other assembly damage.
What finish issue on OTF knives is most often missed?
Blade rub near the exit path. Buyers often miss it because it only appears at an angle. If it shows as repeated coating wear or exposed metal on multiple units, treat it as a process defect, not random handling.